2. Fix the eyebrows |
First add a new layer by clicking on the Create a new Layer icon  in the layers palette.
Rename this layer to Left Eyebrow by double clicking on its name.


Rename this layer to Left Eyebrow by double clicking on its name.
Tip: if you hold down the Alt key (option key on the Mac) when you click the Create a new Layer icon , you'll see the New Layer window popping up:
In this window you can change the name of he layer (A) or give the layer a color (B) in the layers palette. Whether you rename the layer by double clicking on its name or by entering the name in the New Layer window is all up to you. Throughout this tutorial however I will ask you to rename the layer afterwards (just a habit of mine).
Continue by selecting the Clone Stamp Tool  in the tool bar and checking the options bar:
Make sure that your Clone Stamp options look the same. In the option bar you'll notice that a particular brush was chosen. Click on the button with the black triangle (marked with A in the screenshot below) and select aMaster Diameter of 9 px and a Hardness of 0%:
Notice when you go back to the screenshot of the options bar that we have selected Use All Layers. What this means is that the Clone Stamp Tool will take all layers in account, so even if we're working on an empty layer, it will still clone all information that is visible in our document window, even if what we're cloning is on a different layer. This has three important advantages:
- We're not damaging the original photograph (our background layer) in any way.
- We can easily correct our mistakes by using the Eraser Tool
 in our tool bar to remove cloned pixels on our "clone layer" (in our case the Eyebrow layer).
 - We can apply effects to our corrections, for example by applying a Gaussian Blur, without affecting the original image.
Now look at this screenshot:
By selecting the option Aligned in our options bar our target (B) and source(A) of the Clone Stamp Tool will always be aligned at any time, as if they are glued together; if you move the mouse pointer up then our 'virtual source' (A) will move up, move it to left and the virtual source will move to the left too.
Ok, let's start cloning. With the Clone Stamp Tool selected, hold down the Alt key (option key on the Mac) and move the cursor to the area marked with A. Press and release your left mouse button (this will mark thesource area for the Clone Stamp Tool) and release the Alt key (option key on the Mac).
Zoom in to about 300%.
Tip: the best way to zoom in at 300% is by selecting the Zoom Tool  and using the mouse to select the area where you want to zoom in (click and drag):
Now you can either:
- use the Status Bar to enter 300:

- use the Navigator Palette and enter 300:

- or press Ctrl and - (Command and - on the Mac) until you've reached 300% in your status bar. If you have the need to zoom out: press Ctrl and + (command and + on the Mac).
The choice is all up to you, use what you feel most comfortable with.
Note: if the Status Bar or your Navigator Palette is not visible, then just go to the menu and select View and make sure that they are enabled (a in front of it).
Note: if the Status Bar or your Navigator Palette is not visible, then just go to the menu and select View and make sure that they are enabled (a
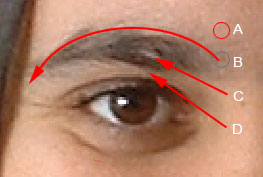
Let's return to our previous screenshot:
What we're going to do now is cloning the skin above the eyebrow and use it to hide the upper area of the eyebrow, since me want to make the eyebrow took smaller. We do that by following the curve as marked with the top red arrow. If you don't have a steady hand, then you might consider to follow the curve by using single clicks.
Once you're done you move the cursor back to location B , but this time you start slightly lower, a distance that's only slightly smaller than the size of our cursor. Now you're going to repeat the same step again; following the curve and hiding the hairs of the eyebrow with the cloned skin.
Depending on the size of your brush my might have to do this 2,3 or 4 times, every time starting slightly lower.
Depending on the size of your brush my might have to do this 2,3 or 4 times, every time starting slightly lower.
Note: after you went over the eyebrow with a few passes, you're probably going to see some ugly, artificial looking patterns:
This can be corrected by using the Clone Stamp to clone skin from different source areas. When you do that you might consider to lower the opacity a bit, to around 50% and use a slightly larger brush (remember the [and ] shortcuts). Another option is to use the Healing Brush Tool  which keeps lighting and color as much as possible intact, but avoid to use the Healing Brush too close to the edge between eyebrow and skin or the results are going to be unpredictable.
You might have noticed that I also had two areas marked with C and D. These are areas that need special attention. I'm not going in a lot of detail about these areas and the only advice I can give is to use the same principles; zoom in, clone areas that are close to the area that needs to be cloned, use a small brush and remove distracting patterns with the Healing Brush Tool.
I know, it's not all that easy when this is your first time that you clone skin, but be patient, practice a few times and you'll get the hang of it pretty fast. Also remember what I said earlier; use the Eraser Toolto make corrections. You can also Undo a step by using Ctrl + Z (command + Z on the mac), Step Backward usingAlt + Ctrl + Z (command + option + Z on the mac) or remove the Left Eyebrow layer and start all over.
Now let's add a new layer by clicking on the Create a new Layer icon in the layers palette.
Rename this layer to Right Eyebrow by double clicking on its name .
Use the same approach that we used for the left eyebrow to fix this eyebrow.
Rename this layer to Right Eyebrow by double clicking on its name .
Use the same approach that we used for the left eyebrow to fix this eyebrow.
Notice when you look at the before/after examples that the eyes start to 'speak', that's because the eyebrows aren't as distracting to the viewer as they were before and now the focus is more on the eyes and that's exactly what we want. Every photographer will tell you that the eyes are a very important part of the face. Eyes can be extremely powerful in close-ups, so pay special attention to them like I will in this tutorial.
Lock the Left Eyebrow layer when you're finished by making it active and clicking on the lock icon  at the top of your layers palette (see screenshot). Do the same for the Right Eyebrow layer.
Locking layers is important when you're planning to use a lot of layers, it will avoid that you make adjustments to the wrong layers and even worse, that you only notice this about 50 steps later... ouch! The reality is that you sometimes assume that a layer is active, when it actually isn't and that's how these mistakes happen.
Note: I'm not a make-up artist and probably none of us is. Needless to say that most female readers probably have a better understanding how to beautify a woman's face than men. If you have problems to understand how to beautify a face, then search on the internet for some faces ( Google/Images for example) to get a better understanding.
Note: if the edges of your new eyebrow are a bit sharp, then use the Blur Tool  in the tool bar to slightly soften the edges. Do this on the eyebrow layers only (!) and make sure that the Blur Tool option Use All Layers is selected when you do this. Needless to say that the layer shouldn't be locked when you do this. Start with a Strength of about 50% (you can find this option in the option bar when the blur tool is selected) and increase or decrease this value as much as you prefer. Make sure that you only blur the edges and avoid to blur too many fine details in the skin or the hairs of the eyebrows. You can avoid this by selecting a smallsize for the Blur Tool brush. You can even consider to use the Blur Tool on a separate layer on top of the eyebrow layers (again, with Use All Layers selected) to avoid that you destroy your previous hard work with your Clone Stamp tool.
Next: Remove Wrinkles and Blemishes
Next: Remove Wrinkles and Blemishes
Written by , personal technology columnist and founder of Most Useful Tricks. You can follow him on the social web or sign up for the email newsletter for your daily dose of how-to guides and video tutorials.
In crossdress photoshoot, photoshop facelifting, photoshop tips for crossdressers


0 comments:
Post a Comment